We’ve been working on a huge project for our contributors here at Alamy HQ, namely updating what we call the ‘Contributor Tools’. The project encompasses upload, submission tracking and metadata management and we’re pleased to announce that the roll-out is about to begin. We’ve been gathering feedback from you, our photographers, and we’ve put it all into something that we think you’re going to love. We’ve been testing lots over the last few months both internally with Alamy staff and with groups of Alamy photographers and we’re nearly ready to let you all get started.
Before we get into the details…
We want to make it clear that any work you’ve already done with the existing tools will not be wasted. Any annotation already completed or currently being worked on will transfer over to the new system.
The new tools are designed to make submitting images to Alamy incredibly streamlined, meaning you’ll be able to get your images online and in front of customers quicker than ever before. As with all new systems though, there will be a learning curve whilst you get to know the new tools so comprehensive instructions will be provided and our Contributor Relations team will be on hand to answer any questions you have once the new tools are released.
The roll-out will likely begin this week and we have a number of technical aspects to consider with the order by who it is released to and when. We have over 50,000 photographers with images online and many more who have registered and are yet to submit, so the process may take up to a couple of months to complete. Please be patient if you have not yet got the new tools. There is no need to change the way you are currently working with the existing tools – to reiterate – all data will be transferred over to the new system from the old.
The information below is a summary of some of the key features, and we’re sure you’ll have detailed questions on how each area will work. For now, this is not the best time to offer detailed instructions but these will be provided to you from a detailed help document available within the tool when you get it.
Now, on with the details!
Keywords
Keywords will be called tags and there will be just one field for these. You’ll still be able to enter a caption and non-searchable description as normal, but there is a max limit of tags you can enter – 50. For those images that already have more than 50 tags it’s fine, they will be carried over and you can have more than 50 tags for images carried over from the old system. Nothing will be lost, but you won’t be able to add any additional tags (if you so wish to) to these legacy images until you remove some if the tag count exceeds 50.
For any new images the 50 tag cap will be in place. Phrases such as “New York City” can be added as a single tag, so you wouldn’t have to use 3 tags up for “New”, “York” and “City”. Out of these tags, you can choose to make 10 of them ‘supertags’. These give those tags extra weighting and therefore a higher priority in the search engine. For those images already online, the essential keywords will be transferred over to be supertags, with the main and comprehensive words being added as regular tags. In order to get an image live and on sale, you just need a minimum of a caption and 5 tags. Nothing else. Embedded captions and keywords from IPTC data will be imported.
Everything you do with tags can be applied to multiple or single images at a time and that includes adding and removing of single tags or adding and removing supertags. Tags can be added, removed, made common across a batch or made to supertags with a single click. Let’s say you forgot to add the tag “USA” to all your images you took whilst travelling across America. All you need to do now is search for the tag “America” (assuming you added that before), select all images and then just add the “USA” tag once and hit save – you’re all set without overriding any other data.
Other data about releases, location and number of people etc will be optional extras for you to fill in if you so wish.
A one stop shop
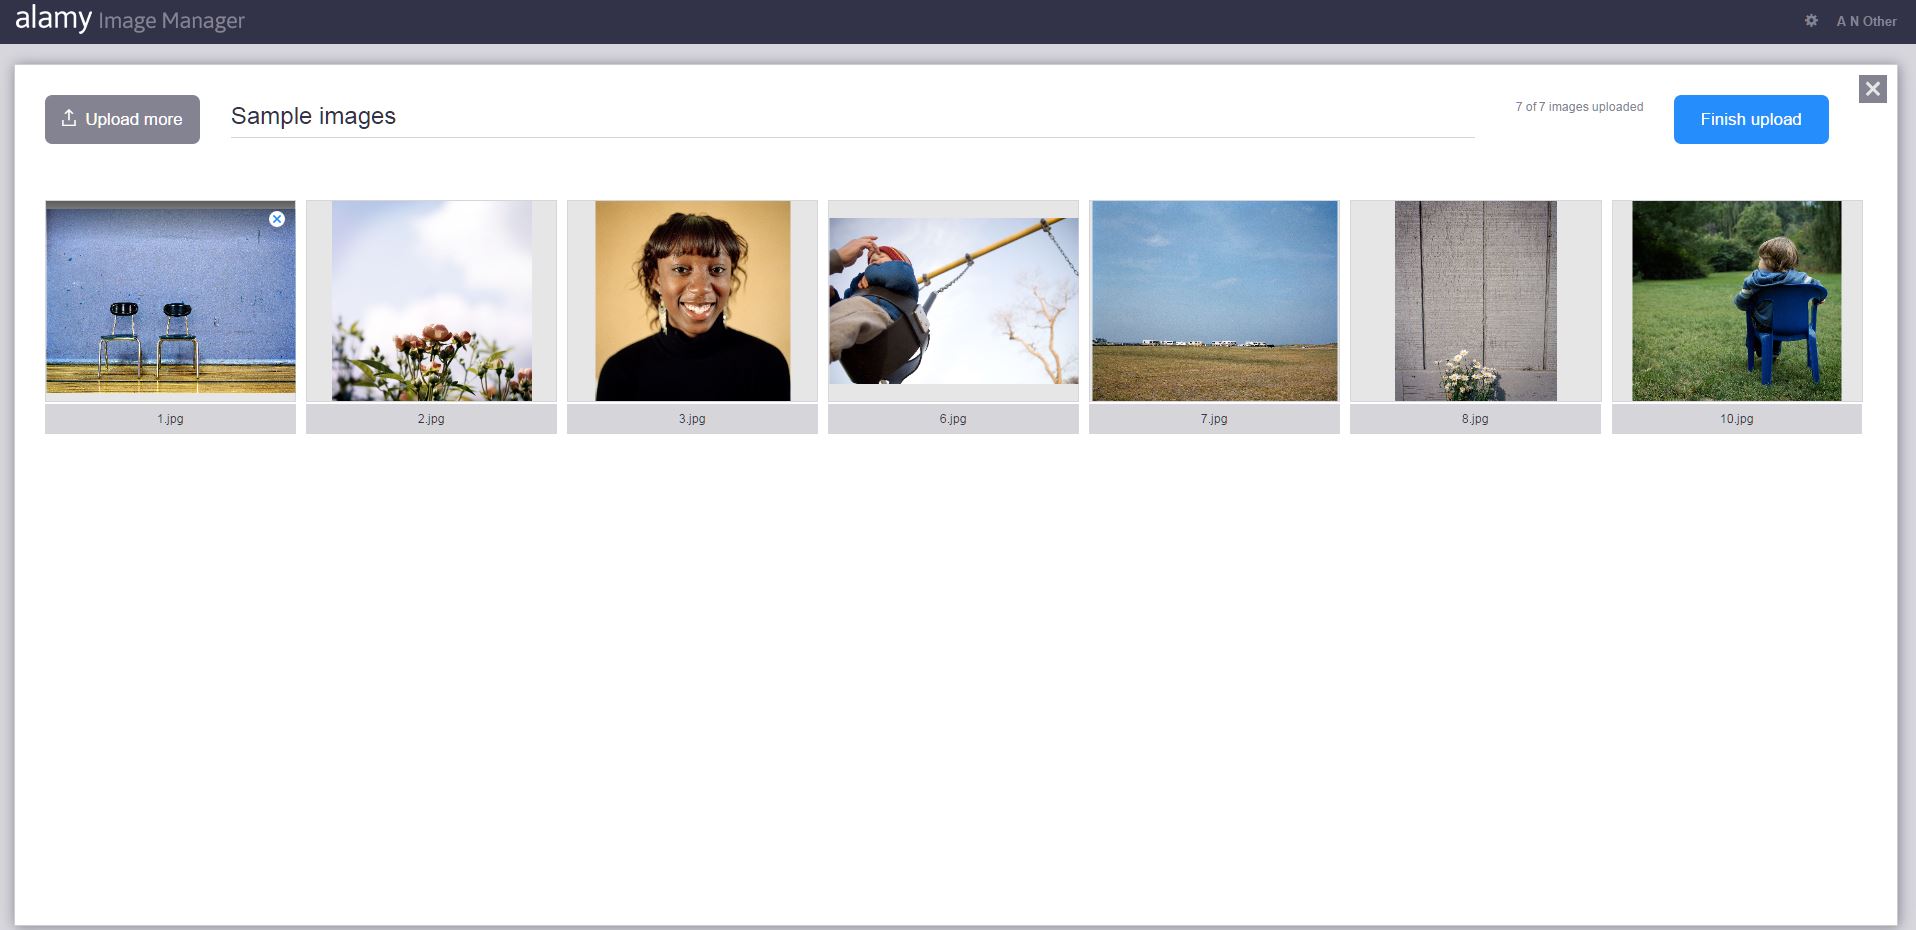
The “Track Submissions” page will be no more, and your submissions will be listed instead within the Alamy Image Manager. From here you can click on single or multiple submissions to view and work on the images uploaded within them. You can also rename submissions if you want to make them more recognizable and easier to find. The upload tool sits within the manager, making it easy to get your next batch of images uploaded.

Upload and Quality Control
Upload has been revamped with test submissions only requiring 3 images now, and for all submissions thumbnails of each image you send will be visible as they upload. Before committing any submission to QC, you’ll be able to remove any images uploaded, so gone are the days of uploading those pesky images that sneak into your final edit folder. The FTP upload will remain the same. For Quality Control, your QC ‘rank’ will be visible and will be based on your previous QC history. More details on this will be available in due course, but for the small amount of contributors who end up with a low rank and then go on to fail QC, the upload tool will be frozen for them for a short time. This means no more wasted effort or waiting around to find out if images are failed and a much quicker system overall. We know you’ll have questions on this right now, but just to repeat, further details will be given when appropriate.

A ‘discoverability’ score for each image
As you enter details for your images a status bar will show you the overall discoverability of that image (or those images) based on the amount of data you enter. The discoverability bar gives you an indication of how discoverable (visible) your images are within the search results seen by customers. The discoverability bar does not indicate a specific ‘rank’, but will increase as you add more information to your selected images. If the discoverability bar is fully green and shows ‘Optimized’ then there is no more information you can add to improve it. It’s not necessary to optimize every image. The discoverability bar is not in any way ‘reading’ or ‘scoring’ the quality of your metadata, it simply increases with the volume of searchable information you enter.
The only mandatory fields are now Pseudonym, Caption, Tags (minimum 5), Licence type and Image type. Everything else is completely optional. You can set defaults for Pseudonym, Licence type and Image type to make the process even quicker.
Simplified restrictions
In addition to the simplified restrictions that were recently introduced across Alamy, there will now be a check box for “Editorial Only”. This means you can assign editorial only restrictions to an image if you wish and this includes Royalty Free images.
Goodbye Flash
Oh, and we’re getting rid of Flash, yay! This makes the tools far more accessible and means you’ll be able to work on your images via an iPad.
We hope this overview gives you a good idea of what to expect with the upcoming Alamy Image Manager, further details and instructions will be released in due course. We’re really excited about the release and can’t wait for you to use the new tools.